


Ashenvale Launcher
The Ashenvale Launcher is the app that installs, updates and starts the game. Before every session it checks that the game files are up to date, sets up the render mode and the language you picked, and connects the game through Ashenvale’s network routes. If you open l2.exe directly while the launcher is closed, the game opens the launcher first, so it can check for updates and get everything ready before you play.
First launch
Section titled “First launch”-
Launcher language. The first time, it asks which language you want the launcher in (EN / ES). You can change it later from Settings → General.
-
Sign in. You sign in through your browser with your Ashenvale master account: the launcher never sees your password.
The master account you sign in with is used to validate your connection to the launcher and the servers. It does not limit which game accounts you can play with: you can sign in with one master account and enter the game with game accounts from that one or from other master accounts (for example, through AutoLogin).
-
Locate or install the game. Until it has a folder, the main button says Locate Game:
- If you already have the client, pick its folder: the launcher checks all of it and downloads only what is missing.
- If you don’t have it, pick an empty folder: the button changes to Install and downloads the full client and then the patch.
Main screen
Section titled “Main screen”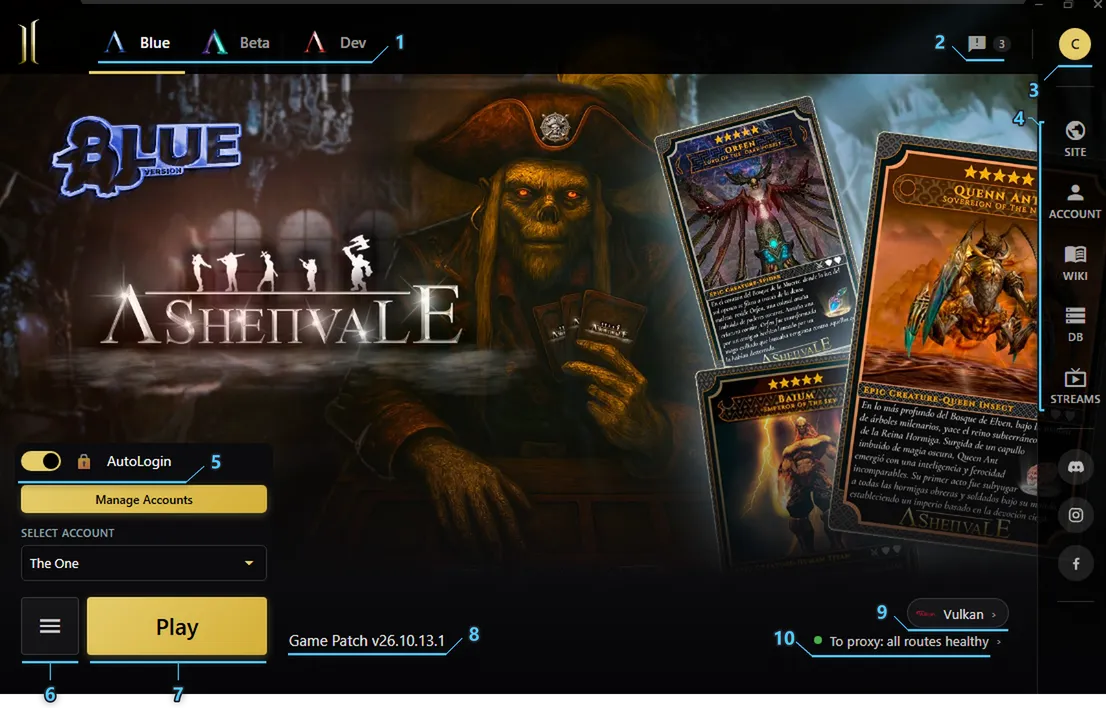
- Servers. One tab per server (for example, Blue and Beta). Each one has its own folder, accounts and game language. You see the servers your account has access to.
- News. Plays the server’s news again; the number is how many news items there are.
- Your account. The circle with the initial of your master account. Clicking it shows your master account, Settings and Sign out.
- Links. Site, Account (web panel), Wiki, DB, Streams and Ashenvale’s social networks.
- AutoLogin. Enters the game with the chosen account without typing a username and password. See AutoLogin and accounts.
- Game Manager. The ☰ menu with quick client options. See Game Manager.
- Play. Depending on the state it says Locate Game, Install, Update, Cancel Update (during a download), Verifying device… or Play.
- Game Patch. The installed patch version. If Safe Download Mode is on, that is flagged next to it.
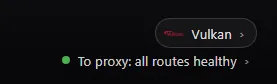
- Render mode. The mode the next client will start with (DirectX 9, DirectX 12 or Vulkan). If the mode is Automatic, it shows what that resolves to on your PC. Clicking it opens Settings → Graphics.
- Connection status. Sums up how the routes to the game proxies are doing: all routes healthy (green), some failing (orange) or no proxies reachable (red). Clicking it opens Network Routes.
Game Manager
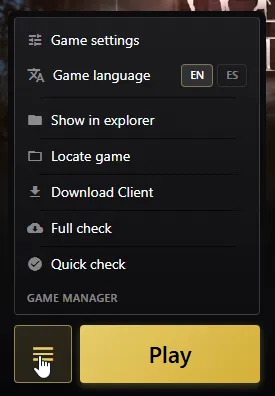
Section titled “Game Manager”The ☰ button to the left of Play (6 in the screenshot) opens quick options for the selected server:
- Game settings: opens Settings → Game Client.
- Game language (EN / ES): the same setting as in Settings → Game Client, closer at hand. See Game language.
- Show in explorer: opens the game folder.
- Locate game: pick the client folder (or an empty one to install it). Use it if you moved the game or the launcher is looking for it somewhere else.
- Download Client: opens the full client download in your browser.
- Full check and Quick check: see below.
Full check and Quick check
Section titled “Full check and Quick check”The launcher updates the game automatically every time you start it, but if you notice something odd in the game that the automatic update doesn’t fix (broken textures, missing windows, a Critical Error on startup, a file you edited by hand), these two options check it thoroughly:
| What it checks | When to use it | |
|---|---|---|
| Quick check | Every Ashenvale patch file, one by one, against its signature (MD5). Downloads again any that are missing or different. | First. It is the shortest and fixes most cases. |
| Full check | The whole client (Step 1/2) and then the patch (Step 2/2). Only downloads again what is missing or damaged. | If the quick one wasn’t enough, if the client was copied from another PC or if something from the base game is missing. |
Keep in mind:
- Close all clients first: while a game is open, some files are in use and can’t be updated.
- The full check takes longer than the quick one because it checks the whole client. If it gets interrupted, run it again: it picks up where it left off.
- Game option files, such as the
.inifiles, are written by the launcher, so your settings are not lost. - Besides this, every time you hit Play the launcher checks the most important files and, if one is damaged, repairs it and asks you to hit Play again.
AutoLogin and accounts
Section titled “AutoLogin and accounts”With AutoLogin you save your game accounts once and get in with one click: pick the account, hit Play and the game starts already logged in, with no username or password to type. Ideal if you play several accounts, several characters or several windows at once. You can save game accounts from any master account, not just the one you used to sign in to the launcher.
- Turn on AutoLogin.
- Click Add Account (or Manage Accounts if you already have some) and add your accounts.
- Pick the account in Select Account and hit Play.
Accounts are saved per server: for example, if you have the Blue and Beta servers available, each one has its own list and the accounts you save on Blue don’t show up on Beta.
Adding an account
Section titled “Adding an account”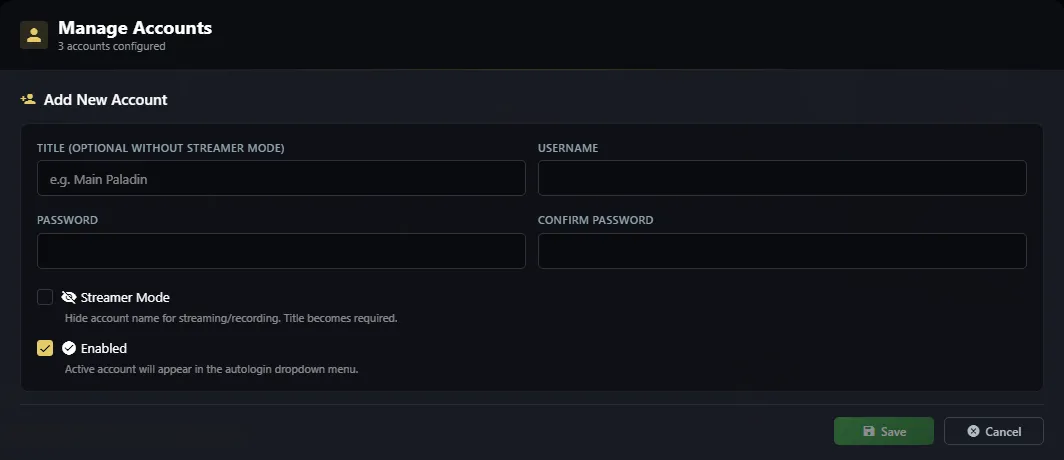
- Title. The name you’ll see for the account in the launcher, instead of the username: your character, “Main Paladin”, “Farm”… This way the real account name is never on screen. It is optional, except in streamer mode.
- Username. The game account name.
- Password (twice, to confirm it).
- Streamer Mode. Hides the username everywhere in the launcher (it shows as Hidden) and the account is only identified by its title. Meant for streaming or recording without exposing your accounts.
- Enabled. If you untick it, the account is paused: it stays saved but doesn’t appear in Select Account. Handy for accounts you rarely use.
The account list
Section titled “The account list”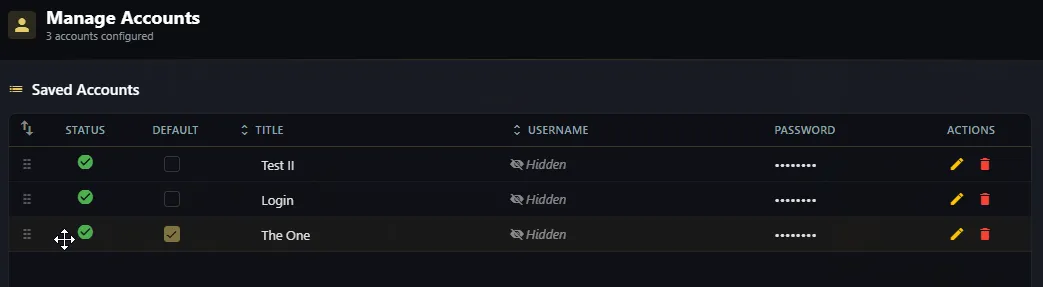
- Drag to reorder. Grab a row by the dots on its left edge and drop it where you want. The order of the table is the order of the Select Account list: put the ones you use most at the top.
- Status. Green tick = Enabled (shows up for AutoLogin); red pause = Paused.
- Default. The account that is already selected every time you open the launcher. There is only one per server; the first one you add becomes the default.
- Title. Double-clicking the header sorts A to Z by title.
- Username. Double-clicking sorts by username. With streamer mode it shows Hidden.
- Actions. The pencil edits the account (title, password, streamer mode or pausing it) and the bin deletes it.
Import and export
Section titled “Import and export”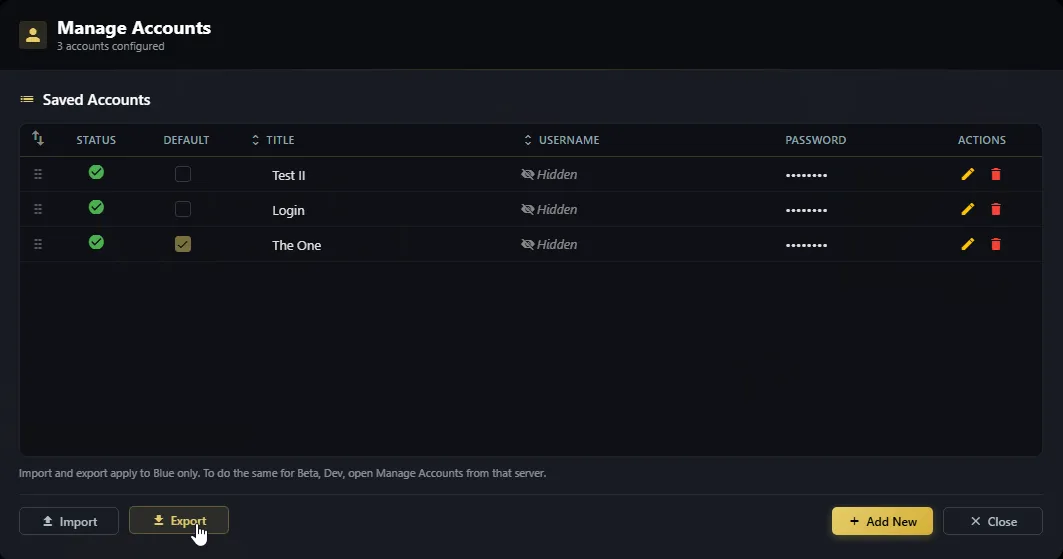
- Import. Loads accounts from a previously exported file.
- Export. Saves all of the server’s accounts to a file (
Accounts_<server>.json), with titles, order, default and streamer mode. - Per server. Import and export only work with the server you have open. For another server, open Manage Accounts from that server.
What it’s for:
- Switching PCs: export on the old one, import on the new one and all your accounts are ready in seconds.
- Backup: before a Factory Reset, reinstalling Windows or uninstalling the launcher, which delete the saved accounts.
- Moving accounts between servers: the launcher warns that the file is from another server and lets you import it anyway.
If an account already exists when importing (same username or same title), the launcher asks what to do with each one: Replace, Rename or Skip (or the same for all of them). The ones you already had keep their order, their title and their default.
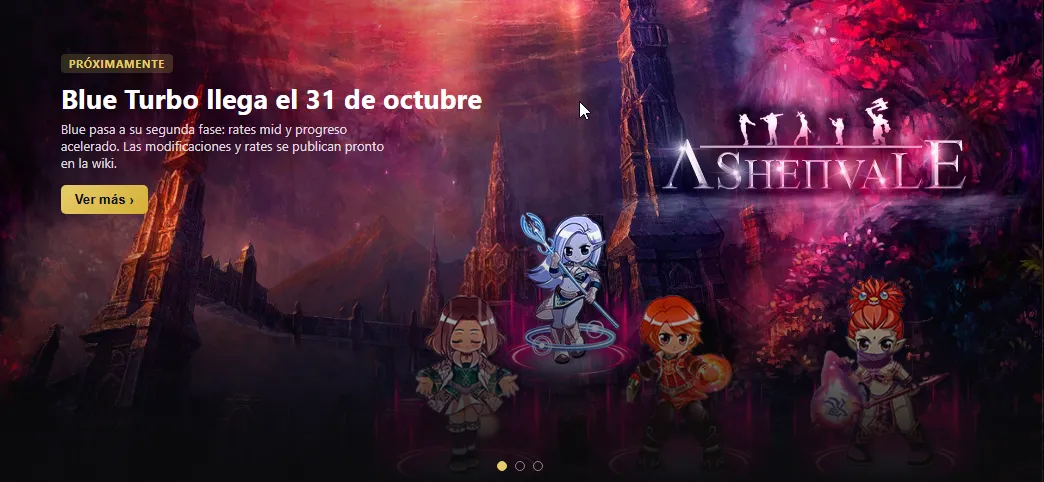
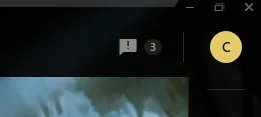
The server’s news plays over the launcher artwork: events, changes and upcoming releases. Some may include a link, such as Read more, that opens the full story in a post outside the launcher. How it is shown is up to the server staff, depending on how important each item is:
- All the time: it plays on its own and keeps playing while the launcher is open.
- Once: it plays on its own when the launcher opens, and then your chosen background comes back.
- Only when you ask: it doesn’t play on its own; you see it with the news button at the top.
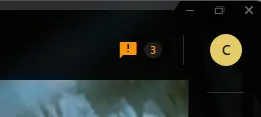
That button replays the news whenever you want. It blinks while there is news you haven’t opened yourself, even if it already played on its own when the launcher started. Click it and watch the news at least once: it stops blinking, and it only blinks again when new items are published.
Closing and the system tray
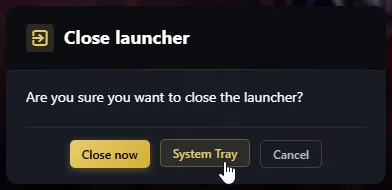
Section titled “Closing and the system tray”When you close the launcher, it asks what to do:
- Close now: closes it completely.
- System Tray: takes it off the screen and keeps it running as an icon in the Windows tray, next to the clock.
- Cancel: goes back to the launcher.
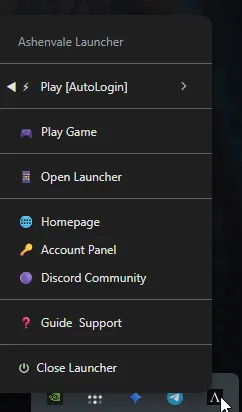
From the tray you get a compact menu (right-click the icon) to do the usual things without opening the window:
- Play [AutoLogin]: jumps straight into the game with one of your saved accounts, grouped by server.
- Play Game: starts the game.
- Open Launcher: shows the window again. A click on the icon does the same.
- Homepage, Account Panel, Discord Community and Guide Support: the site, the account panel, Discord and the support guide.
- Close Launcher: closes it completely.
Settings
Section titled “Settings”Open it from your account (the circle with your master account’s initial, top right) → Settings. It is split into tabs; each one is explained below.
Information
Section titled “Information”This is the info sheet for your launcher and your PC. It’s the first thing to look at when something isn’t working, and it’s where the details support usually asks for come from.
Launcher details
Section titled “Launcher details”| Item | What it’s for |
|---|---|
| App Version | The launcher version. It updates on its own; if support asks for it, it’s here. |
| IP Address | Your current public IP. If it changes (router restarted, another network, VPN), you may need to Allowlist again. |
| Launcher Data Folder | Where the launcher keeps your settings, your AutoLogin accounts and the logs. |
| Launcher Path | Where the launcher is installed. |
Requirements & Components
Section titled “Requirements & Components”The launcher checks that your PC has what the game needs. Each row is marked green if it’s fine, orange if it’s worth checking and red if it’s missing. When something is missing or outdated, a button appears to download it from the official page. Check Requirements checks everything again, for example after installing a component.
| Component | What it is | Required? |
|---|---|---|
| Disk Space | Free space for the game files and their updates. | Yes |
| DirectX 9.0c | The game’s original renderer. Needed even if you use DirectX 12 or Vulkan. | Yes |
| Graphics Card | Your graphics card and its driver. | No, informational |
| Vulkan | Your driver’s Vulkan version, for Vulkan mode. | No |
| .NET Framework | A Windows component. The game doesn’t use it; it is shown as information for support, and some external tools need it. | No |
| Visual C++ Runtime | A Windows component. The game doesn’t use it (its modules already include it); it is shown as information for support, and some external tools need it. | No |
General
Section titled “General”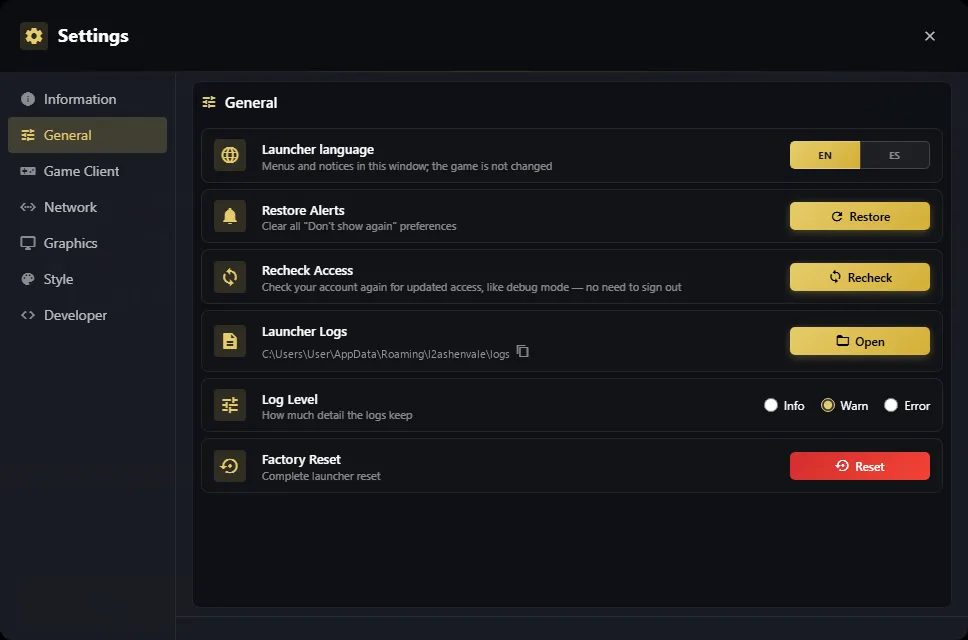
- Launcher language (EN / ES). The launcher’s menus and notices. It doesn’t change the game: that’s what Game language is for.
- Restore Alerts. Shows again every notice you dismissed with “Don’t show again”.
- Recheck Access. Checks your account again for new permissions without signing out. Use it if support enabled something for you and it hasn’t shown up yet.
- Launcher Logs. Open shows the logs folder; if you report a problem, support may ask you for these files.
- Log Level. How much detail the logs keep. Leave it on Warn unless support asks you for Info.
- Factory Reset. Puts the launcher back to a fresh install. Read the details before using it.
Factory Reset
Section titled “Factory Reset”It’s the last resort when the launcher is stuck, shows odd things or nothing else fixes it. Before deleting anything, it shows a list of what it will do and asks for confirmation.
| Deletes | Leaves alone |
|---|---|
| Your session: you’ll have to sign in again. | The game files: no need to download the client again. |
| The saved AutoLogin accounts. | Your game accounts on the server (characters, items, etc.). |
| The configured game folders, the game language and the render mode. | |
| The logs and all preferences (style, dismissed notices…). |
After the reset:
- The launcher restarts and asks for the language again, like the first time.
- Sign in.
- Use Locate Game and pick the same client folder: the launcher checks it and only downloads what is missing.
- Pick the game language again and, if you weren’t using Automatic, the render mode.
Game Client
Section titled “Game Client”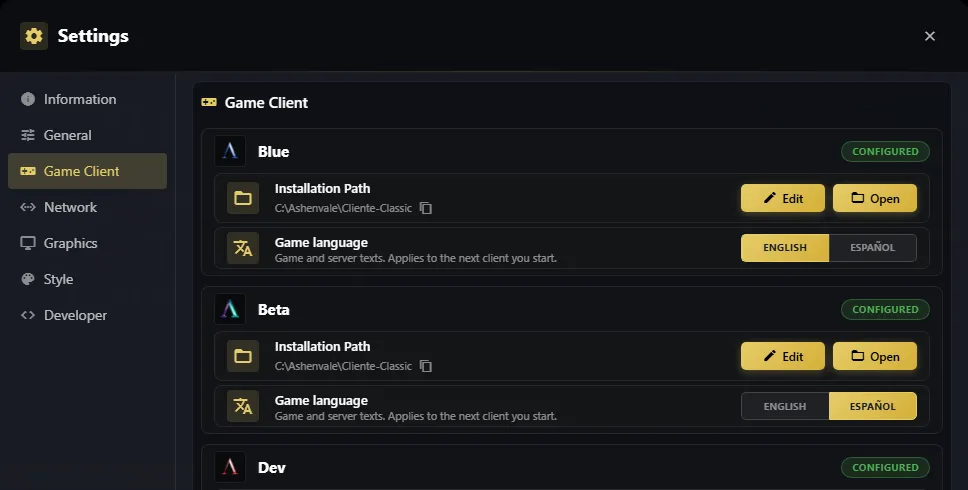
Each server has its own section, with its name at the top. Configured means the launcher already knows where its client is. Each section has:
- Installation Path. Where that server’s client is. Edit does the same as Locate Game; Open opens the folder. If it points to a folder that isn’t the game’s, the client won’t open (see Critical Error from the client path).
- Game language (English / Español). The language of the client and the server. See the details.
Game language
Section titled “Game language”At Ashenvale the client and the server are multi-language: the game comes in English, but you can play it in Spanish: windows, items, skills, system messages, and the server’s dialogs and panels. Some specific names may stay in English, but not their descriptions. And since Ashenvale keeps growing, new content may arrive first and its translation later. See what it looks like in The game in Spanish.
To change it:
- Pick English or Spanish from the ☰ menu next to Play, or from Settings → Game Client.
- Hit Play: the client opens in the chosen language and the server talks to you in that language.
Keep in mind:
- It is saved per server: for example, if you have Blue and Beta available, you can play one in Spanish and the other in English.
- It applies to the clients you start after the change; the ones already open keep their language. If you want it on all of them, close them and open them again.
Network
Section titled “Network”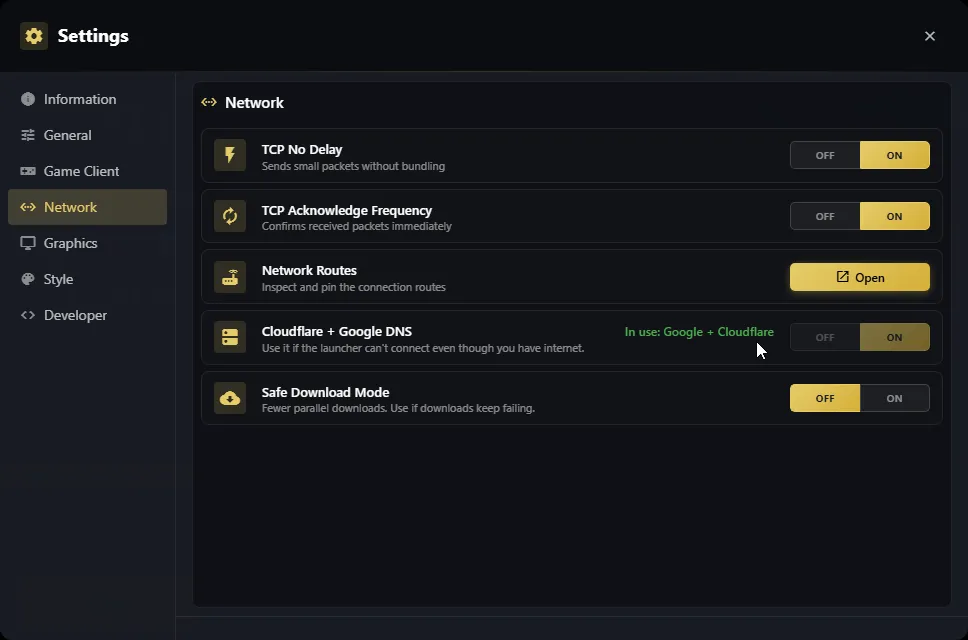
- TCP No Delay. Sends the game’s small packets right away, without waiting to bundle them. Recommended ON. See the details.
- TCP Acknowledge Frequency. Confirms received packets right away. Recommended ON.
- Network Routes. Open shows which relays your game travels through and how each one is doing. See the details.
- Cloudflare + Google DNS. The fix when you have internet but the launcher says it can’t resolve the address or can’t find the servers. See the details.
- Safe Download Mode. Downloads fewer files at a time: slower but more stable. Turn it on if downloads fail or get cut off (unstable internet, weak Wi-Fi). The launcher may turn it on by itself if it sees repeated failures.
Cloudflare + Google DNS
Section titled “Cloudflare + Google DNS”DNS is the service that turns a name (like the name of the Ashenvale servers) into the address where it lives. By default Windows uses your internet provider’s DNS, and some providers can’t find, or are slow to find, the Ashenvale servers. It’s the most common connection problem.
When to use it. If you have internet (you can browse) but:
- the launcher won’t sign in, update or connect;
- you get an error saying the server name can’t be resolved (hostname,
ENOTFOUND); - the launcher warns “Your internet works, but your DNS provider can’t find the Ashenvale servers.” In that case it offers the Use Cloudflare + Google DNS button directly.
How to turn it on:
- Settings → Network → Cloudflare + Google DNS → ON.
- Confirm the notice and accept the Windows administrator prompt.
- In use: Google + Cloudflare appears on the right. Try again.
What it does:
- Windows switches to the public DNS of Cloudflare (1.1.1.1 / 1.0.0.1) and Google (8.8.8.8 / 8.8.4.4), which are fast and find the servers without trouble.
- It changes the DNS for the whole PC, not just the launcher: the game and the browser use it too. It has no downsides; many people use them all the time.
- The launcher keeps your previous DNS: if you turn it off, Windows goes back to exactly what you had.
- It can’t be used on company PCs whose DNS is managed by the organization.
Network Routes
Section titled “Network Routes”The game doesn’t connect straight to the game server: it travels through Ashenvale relays (proxies) in different countries. The launcher measures how each route between each relay and the game server responds, uses the ones that respond best and keeps others as backup: if one fails, the game carries on through another without disconnecting you. Open shows how each one is doing.
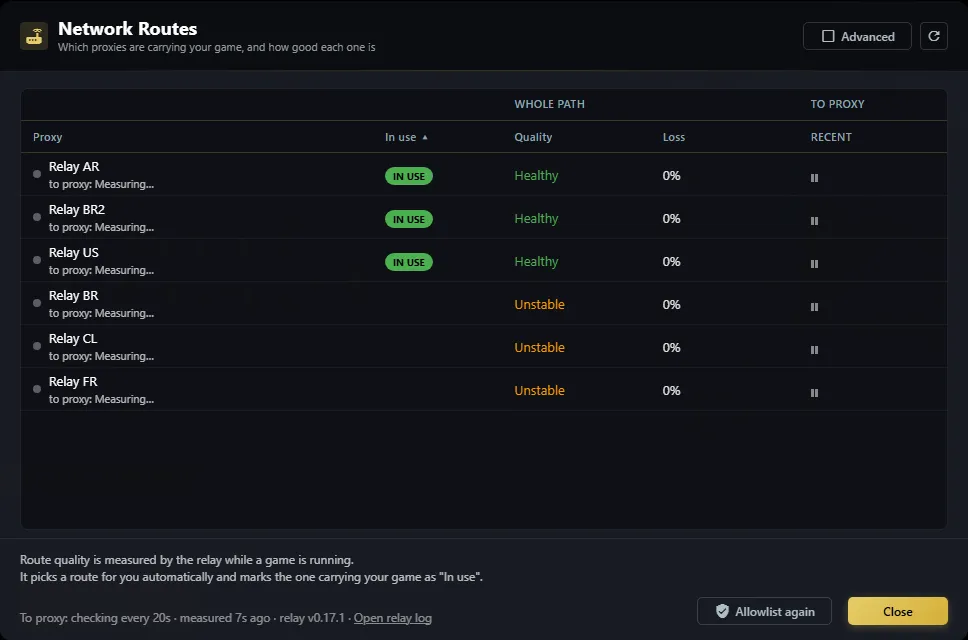
- Proxy: each relay, with its status towards the proxy (green dot = responding).
- In use: the routes carrying your game right now (there can be more than one); the rest stay as backups.
- Quality: Healthy (green) or Unstable (orange), measured while the game is open. Unstable doesn’t mean the connection is bad or down: it means that, compared with its best responses, that route had a latency spike. It can still be used and you don’t need to do anything: the launcher already picks the routes that respond best.
- Loss: percentage of lost packets. Ideally 0 %.
- Recent: how it responded in the latest measurements.
- Allowlist again: if the game won’t connect after switching networks or restarting the router, click it.
- Open relay log: the connection log, useful for support.
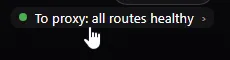
Indicator and shortcut. At the bottom right of the main screen, the connection status
sums up how the routes are doing. Clicking it opens this window.
TCP No Delay and TCP Acknowledge Frequency
Section titled “TCP No Delay and TCP Acknowledge Frequency”Lineage II sends lots of small packets (movement, skills, attacks). By default Windows sometimes holds them back to bundle them or confirms their arrival late, and that shows up as lag. These two settings prevent it:
- TCP No Delay: every packet goes out right away.
- TCP Acknowledge Frequency: every received packet is confirmed right away.
It’s recommended to leave both ON. The first time, the launcher may ask whether you want to turn them on (Network optimization). They change Windows’ network settings, so they ask for administrator permission; when you turn them off, Windows goes back to the value it had before. If they were already turned on by another program or by hand, they show as ON here even though the launcher didn’t change them.
Graphics
Section titled “Graphics”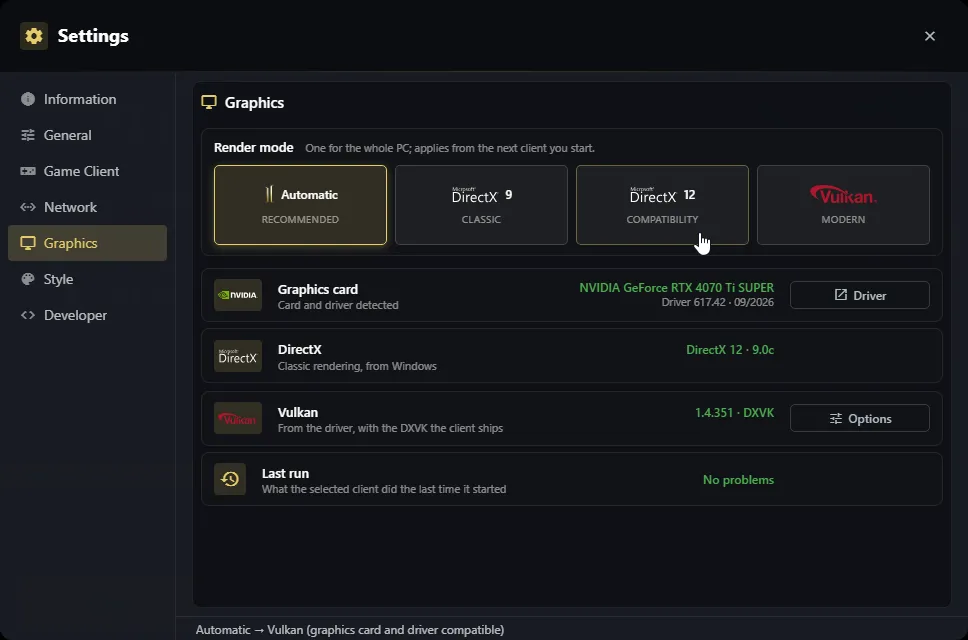
- Render mode. Automatic, DirectX 9, DirectX 12 or Vulkan. See the details.
- Graphics card. Your card plus its driver version and date. Driver opens the NVIDIA, AMD or Intel download page.
- DirectX. Your PC’s DirectX version.
- Vulkan. Your driver’s Vulkan version and the client’s DXVK version (shown after the first start with Vulkan). Options opens the Vulkan options.
- Last run. How the client’s last start went. See If Vulkan fails.
At the bottom of the window, a line says what Automatic picked and why (for example, Automatic → Vulkan (graphics card and driver compatible)).
The chip at the bottom right of the main screen is an indicator of the mode the next client will start with and a shortcut: clicking it opens this tab. For example:
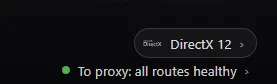
Render mode
Section titled “Render mode”Lineage II is a DirectX 9 game. Ashenvale includes render wrappers that translate that DirectX 9 to modern APIs, to make better use of today’s graphics cards. There is a single mode for the whole PC (it applies to every server) and it takes effect from the next client you start.
| Mode | What it is | Who it’s for |
|---|---|---|
| Automatic (recommended) | The launcher picks for you: Vulkan if your card and its driver support it well; otherwise DirectX 9. | Almost everyone. |
| DirectX 9 (classic) | The game’s original renderer, with no translation. | Old cards, or if the other modes give you trouble. It’s the most compatible. |
| DirectX 12 (compatibility) | The game’s DirectX 9 running on top of DirectX 12. It depends on Windows (10 or 11), not on the card. It doesn’t improve performance: it lets you use extra features and customizations of your graphics card, which you set up from its own app or panel. For example, frame generation, which makes the picture look smoother: Smooth Motion in the NVIDIA App or Fluid Motion Frames in AMD Software: Adrenalin Edition. | Anyone who wants those features, especially if their card doesn’t get along with Vulkan. Automatic never picks it. |
| Vulkan (modern) | The game translated to Vulkan with DXVK, which ships with the client. It usually gives more FPS and less stutter, and enables the Vulkan options. It’s available if your graphics card supports Vulkan. | Cards with Vulkan 1.3 or newer (most NVIDIA, AMD and Intel cards from recent years) and an up-to-date driver. |
How Automatic decides. It only picks Vulkan if all of this is true; if anything fails, it uses DirectX 9:
- your card and its driver support Vulkan 1.3 or newer;
- the driver is less than 4 years old;
- the card isn’t on the list of models with known problems;
- Vulkan hasn’t failed before on your PC.
You can pick Vulkan by hand even if your PC doesn’t meet all of this: the launcher warns you it’s below what is recommended. If the server sets a mode for everyone (for example, during a problem with Vulkan), the chips are locked with a padlock and the notice Set by the server; your choice is kept and comes back when the lock is lifted.
If Vulkan fails: automatic fallback to DirectX 9
Section titled “If Vulkan fails: automatic fallback to DirectX 9”If the game fails to start with Vulkan twice, on the next Play the launcher opens the game in native DirectX 9 for that one time only and warns:
Vulkan could not start the game on this PC, so DirectX 9 is used this time. The next start tries Vulkan again; if it keeps happening, pick DirectX 9 in Settings → Graphics.
Your choice isn’t touched: the next start tries Vulkan again. If the problem repeats:
- Update your graphics card driver (Driver button). It’s the most common cause.
- If it still happens, pick DirectX 9 by hand: it stays that way until you change it.
Last run shows the status: No problems, how many Vulkan starts didn’t finish (with Reset counter), or Vulkan did not start · DirectX 9 for now (with Retry Vulkan).
Vulkan options
Section titled “Vulkan options”With Vulkan, the Options button on the Vulkan row opens image settings that the game’s DirectX 9 doesn’t have. They are saved per client and apply on the next start.
| Option | What it does |
|---|---|
| Antialiasing | Smooths jagged edges (2x to 16x). |
| Filtering | Anisotropic filtering: sharper ground textures in the distance (2x to 16x). Costs almost no performance. |
| Sharpness | Normal, Sharp or Sharper. |
| V-Sync | Syncs with the monitor: prevents image tearing in exchange for a little delay. |
| Smooth transparencies | Smooths grass, fences and leaves. Requires 2x antialiasing or more. |
| HUD | An on-screen counter with FPS and/or the card: when it shows, which corner, opacity and size. |
| Log | How much detail the Vulkan log keeps. Leave it on Normal unless support asks for another level. |
Recommended loads values based on your card’s power; Factory settings puts everything back as it came. Nothing applies until you hit Save.
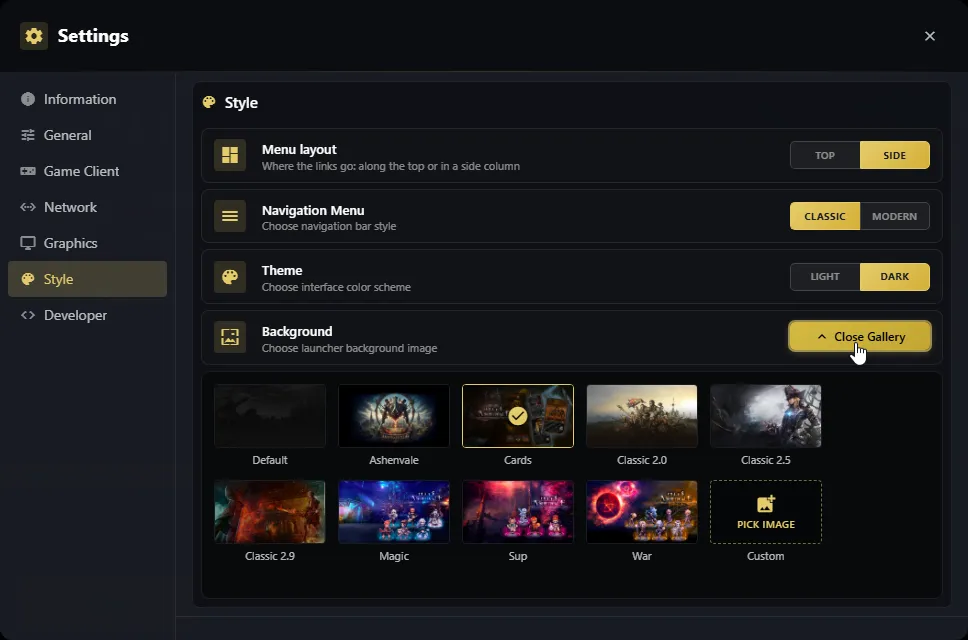
These only change how the launcher looks; they don’t affect the game.
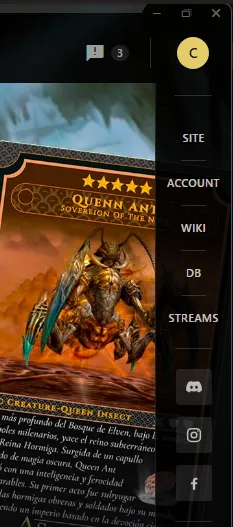
- Menu layout. Side (servers at the top and links in a column on the right) or Top (servers in a column on the left and links at the top).
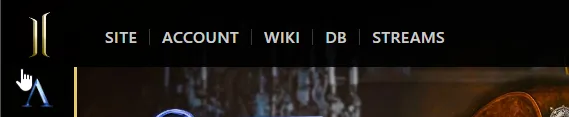
- Navigation Menu. Modern (with icons) or Classic (names with separators).
- Theme. Dark or Light.
- Background. The image behind the launcher. Pick one from the gallery, or Pick Image to use your own (jpg, png, gif, bmp or webp).
Same features, different look
Section titled “Same features, different look”Menu layout and Navigation Menu change where the links are and how they look, but the features are exactly the same. This guide uses Side + Modern, the default; if you picked another combination, look for the same thing somewhere else.
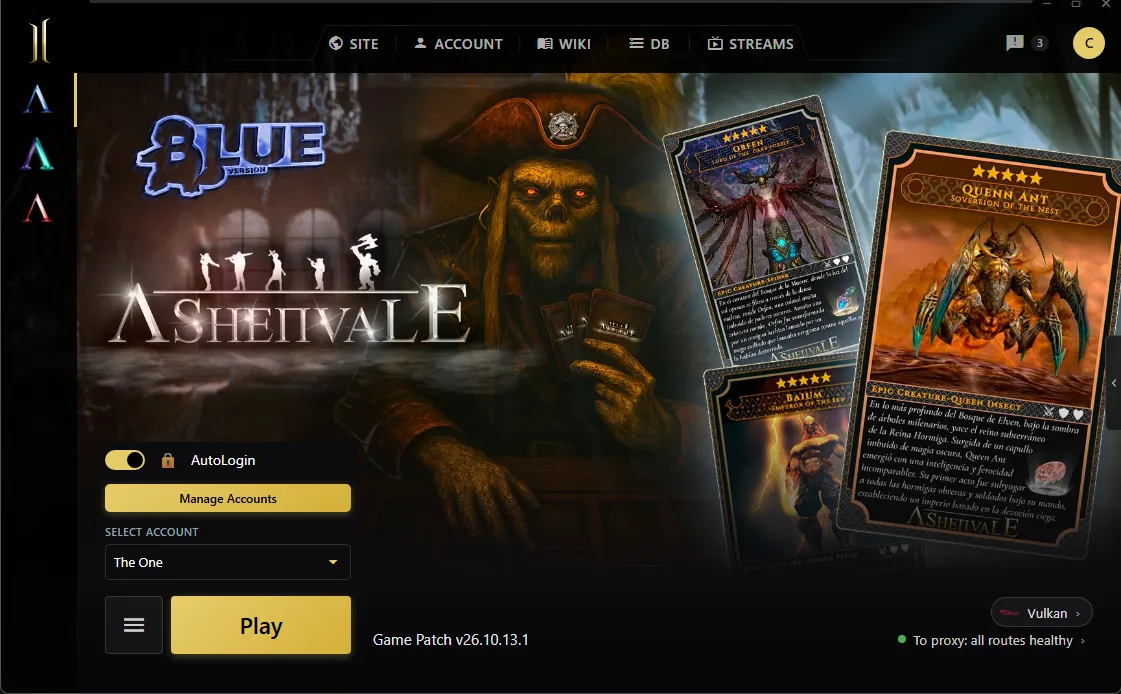
With Classic, the links show only the name, separated by lines, with no icons:
Common problems
Section titled “Common problems”You have internet but the launcher says it can’t resolve the address or can’t find the servers
Turn on Cloudflare + Google DNS in Settings → Network.
The game won’t connect after switching networks or restarting the router
Network Routes → Allowlist again.
Downloads fail or get cut off
Turn on Safe Download Mode.
”Close all game clients to update.” shows up
A client is open (or hung in the background): close it and try again.
The game opens with errors, broken textures or a Critical Error
Quick check; if it persists, Full check.
The launcher says the folder isn’t the game’s
Locate game and pick the right client folder.
The game won’t open, closes or runs badly with Vulkan
Update your graphics card driver; if it persists, pick DirectX 9 in Graphics. If you changed the Vulkan options, go back to Factory settings.
The game language didn’t change
Clients that were already open keep their language: close them and open them again. See Game language.
The launcher behaves oddly and nothing above helps
Factory Reset. Export your AutoLogin accounts first.